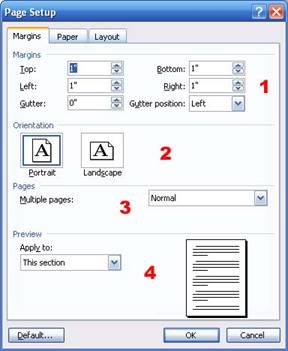
The first tab, Margins, has four sections.
The first section, titled Margins, lets you specify margin and gutter options. Margins are the white space around a document; different margins can be set for the top, bottom, left, and right of the document. To change a margin, just enter the number of inches you want in the appropriate text box.
Gutters are extra space along fold or binding lines. For example, if you’re creating a brochure that folds on the right, you can set the gutter size to be an inch, and the gutter position to the right. That way, you have extra space to fold (or bind) the document without cutting off your text.
The second section of the Margins tab is called Orientation. You can pick either Portrait (which is the default vertical orientation) or Landscape (which is a horizontal orientation). Landscape can be a good choice for documents that are horizontally wide, like spreadsheets with lots of columns, calendars, or banners.
The third section is called Pages. You can use the drop-down menu to choose how documents with multiple pages will print. You can choose one of these options:
The last part of the Margins tab lets you apply your page setup options to the whole document, this section, or from this point forward. It also gives you a preview of how your changes will look. (The preview is generic and will give you a general overview, rather than focusing on changes specific to your document.)
|