Another great thing about Word’s toolbars is that they are very customizable. You can move them, add buttons to them, or remove buttons. You can even create a toolbar from scratch!
First, let’s look
at how to move toolbars around. If you put your mouse over the line of
vertical dots next to any toolbar, it will turn into a four-sided arrow,
like this:
Now, you can hold down your left mouse button, and drag and drop the toolbar to anywhere you want: to the top, left, right, bottom, or middle of your screen!
This works for any toolbar that is anchored to one side of your screen, including task panes. For toolbars that are floating in the middle of your screen, just left-click and drag and drop on the title bar:
Once you move the toolbar, Word remembers its position. That means if you close the toolbar and re-open it, Word will place it wherever you moved it to. Word even remembers this position after you’ve closed the program. This means you can set up your Word screen however you want and have it that way every time you open the program.
You can also customize the toolbars to show different buttons. The easiest way to do this is to click the small arrow to the far right of any toolbar. This arrow will be present regardless of where the toolbar is on your screen. Here’s an example:
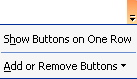
You can also click the Show Buttons on One Row option to compress all your toolbars onto one row if you want to save space. To customize the current toolbar, choose Add or Remove Buttons. The menu will expand and you’ll see the sub-menus pictured on the right. The first sub-menu contains two items: the name of the current toolbar (Formatting, in the example on the right) and a customize option.
Let’s look at what happens if we pick the Formatting option. In the sample on the right, you can see that we have a whole list of toolbar buttons. Each listing shows the command, its shortcut, and its icon (if the command has an icon). These options work the same as the main toolbar menu: if an option is checked, it’s on; if it’s not checked, it’s off. You can change this status just by clicking on the button you want or don’t want.
You can also click the Reset Toolbar button at the very bottom of the menu to reset the toolbar to its default position and buttons, erasing any changes you have made. |