Word’s 19 toolbars are all really useful in certain situations, but you probably won’t want all of them open at the same time. Some of them will open automatically when you perform a related command. (For example, when you insert a picture, the picture toolbar will appear on your screen.) It’s good to know how to open and close the toolbars that you want though, this way you will have complete control over them.
One way you can add or remove a toolbar is by using the right-click feature we looked at briefly before. If you right-click a blank area next to the menus or existing toolbars, you’ll see the menu pictured to the right. Toolbars that are currently enabled will have a check next to them. If you want to disable that toolbar, just click it! Toolbars that are off will not have a check. You can enable any toolbar on just by clicking it. Another way you can enable or disable toolbars is by using the View menu.
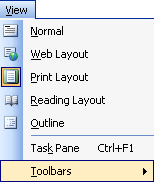
If you click the View menu and click Toolbars, you’ll see the same menu pictured above. The same rules apply: if a toolbar is checked, click it to uncheck it and it will be disabled. If a toolbar is not checked, click it to check it and enable it. You can also open toolbars from the standard toolbar.
Use the drawing
button Some toolbars will appear as boxes in the middle of your screen, like the WordArt toolbar (see the below example):
With toolbars like these, you can also use the small X in the top right hand corner of the toolbar to close it.
That’s all there is to adding or removing toolbars!
|