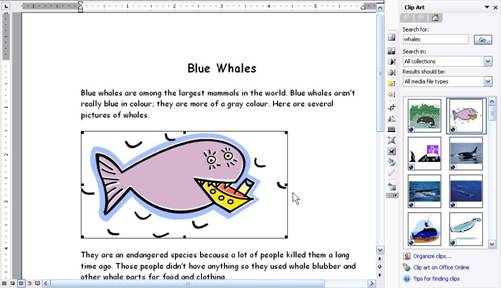
Inserting ClipArt may be easy, but as you can see by the sample above, it doesn’t always turn out the way you want. Luckily, we have a number of ways to format ClipArt so it fits in with our document.
The first way to format ClipArt is to move it. You can click on a picture and then drag and drop it to a different location. (You can also right-click it and cut or copy it like you would text. Then, you can paste it wherever you want.)
Let’s look at our sample document again. We’ve moved the picture using drag and drop:
That’s a bit better. The picture is now in the right place, but it’s still too big.
That’s where
picture formatting options come in. To open picture formatting options,
you double-click on the picture, or you can right-click on the picture
and click Format Picture. You can also click the Format Picture icon (
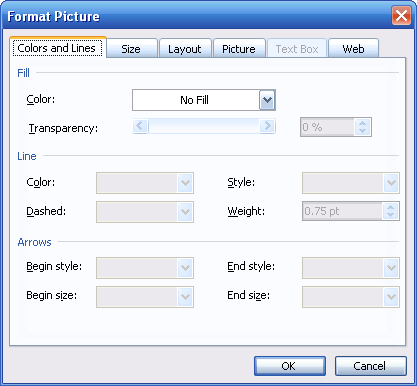
After you perform any of those commands, you’ll see the Format Picture dialog box, which looks like the picture above.
There are a lot of options in here, so pay close attention as we got through each tab. The first tab, seen to the right, is Colours and Lines. The first section under this tab is Fill. You can choose a colour to fill the background of the picture, and then pick its transparency level using a slider bar or by entering the percentage. The next sections of this tab, Line and Arrows, don’t apply to most ClipArt images, so we’ll skip those for now.
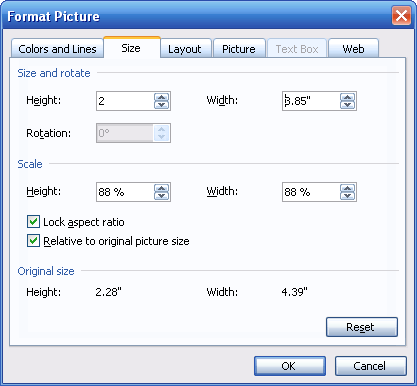
The next tab is Size. This is one of the tabs that you will use the most often; you can see it pictured on the left. In the first part of the box, you can enter the size of the picture (height and width) in text boxes. If the picture has already been rotated, you can also specify that option in degrees.
Another way to change the size of a picture is to use the second section, called Scale. You can enter the height and width of the picture as a percentage. So, if you entered 50%, the picture would shrink to half its current size. (You can check the Relative to original picture ratio if you want the percentages to be part of the original size rather than the current size. This can be useful if you’ve sized a picture too small and need to make it bigger.)
When entering a height or width (as inches or as a percentage), you may see the opposite value change on its own. This will happen if Lock aspect ratio is checked. You should leave this option checked as it prevents a picture from looking stretched or warped when it is enlarged.
The bottom section of this window, Original Size, reminds you what the original size of the photo was. You can click Reset to reset the settings in this window to what they were when you opened it.
Our next tab, Layout, helps you control where the picture is located on the page. Although you can use the same alignment commands (left, right, and centre) we used for text, this tab controls how the text around the picture acts too. Here’s a brief description of each layout type:
If you have chosen any option other than In line with text, you will be able to choose an alignment using the radio buttons below the picture choices.
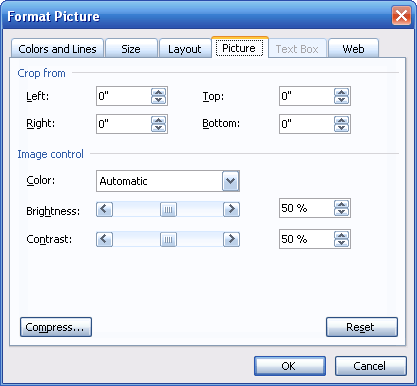
The Picture tab is up next. You can use this tab to crop (cut) a certain amount from the top, bottom, left, or right of your photo. Just type the amount in inches in the appropriate tab.
You can also control image settings with the picture tab. You can use the Color box to pick automatic, black and white, grayscale, or washout colour themes. (Washout themes are great for creating watermarks.) You can also adjust brightness and contrast; just use the appropriate slider bar or enter the percentage in the text box.
Speaking of text box, that’s our next tab. However, it’s only available when working with text boxes (which we’re not), so we won’t worry about it for now.
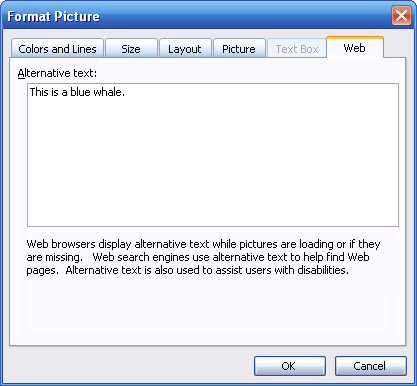
The last tab is Web. In this box, you can type in a description for your picture. Users in Word won’t see it, but if you’re creating a Web page you should type a description. This text will be shown if the picture can’t be displayed (for example, if the user is on dial-up), or if the user has a disability and is using accessibility features. This text may also be used by search engines to catalogue your Web page.
Once you have all your options filled out, click OK. You can also click Cancel to discard your changes. You can also come back to the picture at any time and change its formatting.
|